"Welcome to my Artist Blog! Here, I'll discuss anything art and art related. Check out the Art Journal and Art Tutorials. Please feel free to comment and join the conversation."
This year was Danielle O’Keefe’s year of portraits. 2013 was a more productive year for Danielle. Her drawing seemed more enjoyable again, probably due to an overall improvement in her health over the previous year. Her subjects were also more fun and relaxed, but focused mainly on characters and portraits.
Danielle O’Keefe’s Year of Portraits – Having Fun with Characters.
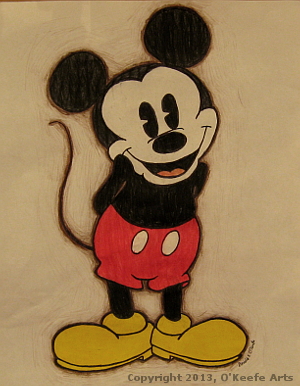
“Mickey Mouse” Colored Pencil on Paper Danielle O’Keefe 2013 (17 years old)
“10th Doctor Portrait (David Tennant)” Sharpie on Paper Danielle O’Keefe 2013 (17 years old)
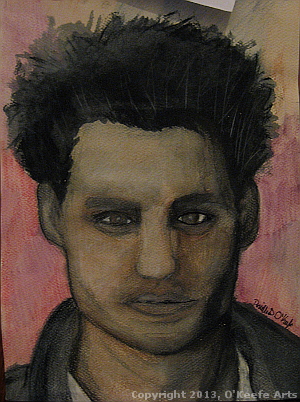
“Watercolor Study” Watercolor on Paper Danielle O’Keefe 2013 (17 years old)
This 8×10 canvas stretching tutorial focuses on a giclee print on canvas. However, the steps can also be applied to any small-sized canvas, whether raw, primed, or painted. I provide tutorials like this for free because I feel that all of us should be able to enjoy creating art without all the extra “costs” that many would charge for this level of information.
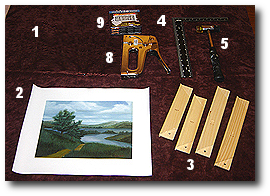
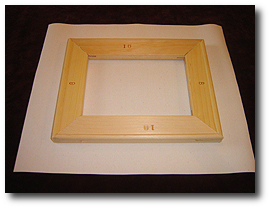
8×10 Canvas Stretching – Materials and Tools
Step 1
Before starting, Assemble all materials and tools for the 8×10 canvas stretching tutorial.
Cloth Work Surface
Giclee Print
Pre-Made Stretcher Bars
Square Ruler
Mallet
Small Hammer (not shown)
Flathead Screwdriver (not shown)
Staple Gun
1/4″ Staples
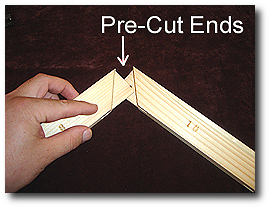
Canvas Stretching – Assemble the Stretcher Bars
Step 2
In this example, we used pre-made stretcher bars that come ready to assemble. These stretcher bars have cut grooves at each end for mating and interlocking to adjacent bars. You may need to sand rough edges on pre-made stretchers because the cutting tools used during manufacturing may leave wood burrs and sharp edges.
Step 3
Make sure that you fully seat the two stretcher bar ends. You must still mate the two bars fully if you see a gap along the seam where the ends meet.
Step 4
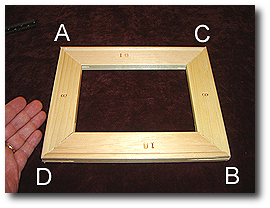
In this view, see all four stretcher bars mated together. However, we must ensure that all four corners of this assembly are square. (i.e., A, B, C, & D)
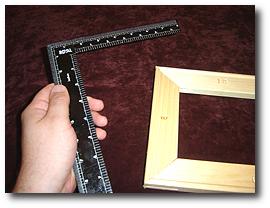
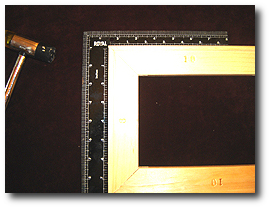
Step 5
We must check each corner using a square ruler to ensure they are square. It is a critical step because if your final assembly is not square, it may not fit into your frame.
Step 6
Hold the square ruler as shown and check that both inside edges of the ruler run flush along the surface of each stretcher bar. If the ruler lifts off one side (not running flush along one surface while being thoroughly flush on the other), you are not square on that corner.
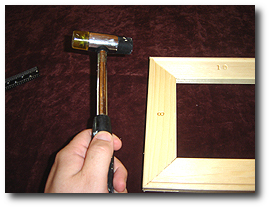
Step 7
Using a mallet, gently tap the corner(s) to make adjustments.
Step 8
Recheck corners until they are all square. Now you are ready to start the canvas mounting process.
Canvas Stretching – Prepare for Stapling
Step 9
Before laying down your giclee canvas print, make sure there are no debris or wood pieces (that may have fallen off during stretcher bar assembly) that could damage the printed surface. Use a soft cloth work surface to minimize the chances of causing minor scratches to your giclee canvas print.
Step 10
Lay down your print (face up) and make a final close examination to ensure there is no damage from the print supplier.
Step 11
At this point, turn over your giclee print so that the image is face down. You are now ready to position your stretcher bar assembly.
Step 12
Place your stretcher bar assembly over your giclee canvas print as shown.
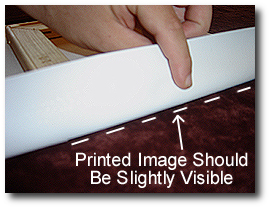
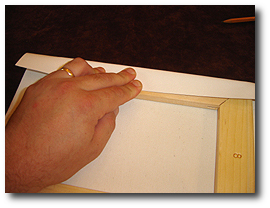
Step 13
Starting with the right side, carefully lift the canvas print and ensure that the image wraps around the front face of the stretcher bar. Repeat this on the opposite side, moving the stretcher assembly left or right until you see the image wrapping equally around both sidebars.
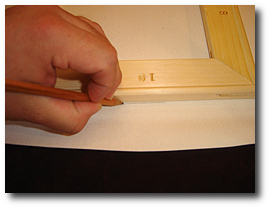
Step 14
Once you have centered the stretcher bar about the printed image, draw a reference line along each side as shown. This reference line will be helpful later if the stretcher assembly moves out of position and you need to realign it.
Step 15
As we did in Step 13 for the side positioning, we want to center the stretcher bar assembly along the top and bottom bars. Carefully lift the canvas print and ensure that the image wraps around the front face of the bottom stretcher bar. Repeat this for the top stretcher bar, moving the stretcher assembly up or down as needed until you see the image wrapping equally around the top and bottom bars.
Step 16
Once you have centered the stretcher bar about the printed image, draw a reference line along each side as shown. The stretcher bar assembly is now centered in the printed image’s vertical and horizontal directions. We are ready to begin the canvas stretching, wrapping, and stapling processes.
8×10 Canvas Stretching – Stretching and Installing First Staples
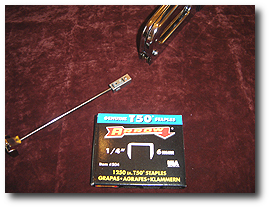
Step 17
For this example, we have selected 1/4″ staples. Load your staple gun, so you stay supplied with staples partway through the following steps.
Step 18
Starting with the top stretcher bar, wrap the giclee canvas print around the stretcher bar as shown. Ensure the stretcher assembly has stayed in the reference lines we drew earlier.
Step 19
Holding the staple gun squarely on the canvas and stretcher bar, staple the canvas to the stretcher bar in the center of the bar as shown.
Step 20
Check that your assembly looks like this – having one staple in the center of the top stretcher bar.
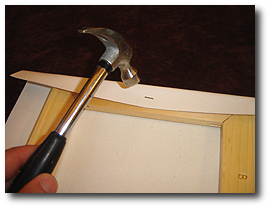
Step 21
Sometimes the staple gun is not held square to the canvas and stretcher bar resulting in a partially inserted staple. Lightly tap the staple with a hammer until fully inserted.
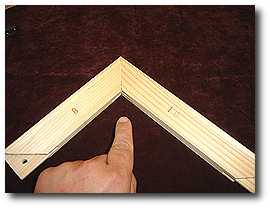
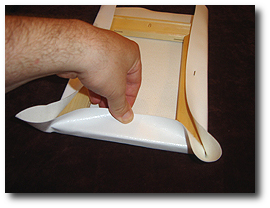
Step 22
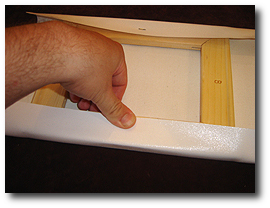
We are now ready to tightly pull and wrap the giclee canvas print around the bottom stretcher bar. Using your hand strength, stretch the canvas, wrap it around the bottom stretcher bar, and hold it securely with your thumb (as shown) in preparation for stapling.
Step 23
While holding your thumb in place, insert one staple in the center of the bottom stretcher bar. Once you have added the first two staples into the top and bottom stretcher bars, you should notice a slight tension pull on the canvas between the two staple points (i.e., points A and B.)
Step 24
As we did in the previous steps for the top and bottom, now we must secure the left and right sides. Starting with the left side, stretch, wrap, and hold the canvas securely in preparation for stapling. (Not shown: Insert one staple in the center of the left stretcher bar.)
Step 25
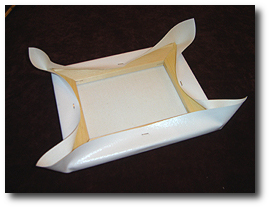
As we did in the previous steps, stretch, wrap, and staple the right side. When stapling opposing sides, you pull the canvas, so it does not droop or sag. Our assembly should now have one staple placed directly in the center of each stretcher bar, as shown.
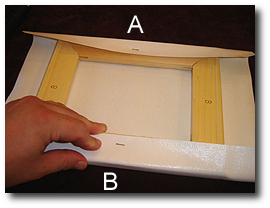
Step 26
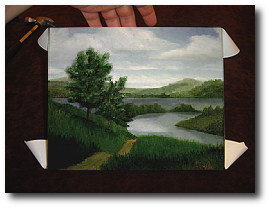
Flip over the assembly, so you look at the printed image on the front. Check that the image is centered vertically and horizontally – you should see the image wrapping equally around all sides, and no ‘white’ border should be visible along the front face. Check that the image has not rotated clockwise or counter-clockwise so that it is no longer square with the stretcher bars.
Also, check that the printed image is tight enough and sagging. In the following steps, we will tighten the canvas as we stretch, wrap, and insert the remaining staples, but now is the time to remove the staples and make adjustments if the position of the image is off or the canvas is very loose and sagging.
8×10 Canvas Stretching – Stretching and Install Remaining Staples
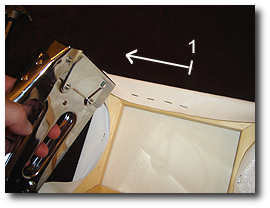
Step 27
Beginning with the top stretcher bar (1), insert staples starting from the center staple and moving left with each new staple until you reach the left stretcher bar as shown.
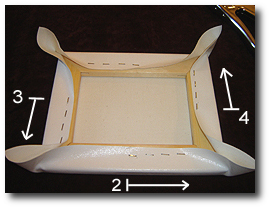
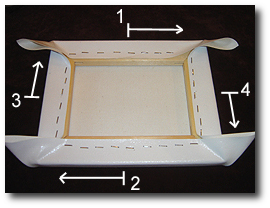
Step 28
Repeat the previous step for the bottom (2), left (3), and right (4) stretcher bars in that order. Remember to start from the center staple and move toward the arrows (as shown) as you staple the remaining three sides.
Step 29
Now we are ready to pull and stretch the canvas for the remaining unsecured areas. Starting with the top (1) stretcher bar, PULL THE CANVAS SNUG, hold it with your thumb, and staple it from the center to the right stretcher bar as shown. Repeat this process for the bottom (2), left (3), and right (4) stretcher bars in that order.
IMPORTANT: You should notice that the canvas has more tension across the front face. It should not sag, droop, or have ripples along the surface. If these conditions exist, you must apply more pressure during pulling and stapling. If you determine that your canvas was not properly stretched, you may need to remove all the staples and repeat the stretching and stapling processes. Hearing the sound of a drum when you tap your finger on the back of the canvas indicates good tension. It may sound more like a resounding thud on a small hand-stretched canvas (as shown in this tutorial).
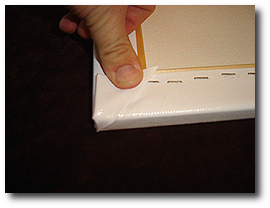
Canvas Stretching – Folding and Stapling Corners
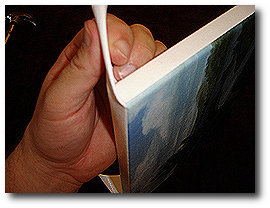
Step 30
Now we must fold and secure the four corners. Hold the canvas material, as shown.
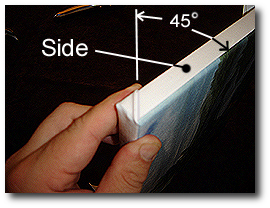
Step 31
While applying pressure, wrap the corner around the stretcher bar as shown so that the fold is on the side of the assembly. The fold should run at a 45-degree angle, as shown.
Step 32
While applying pressure on the canvas material, fold it around the back face and hold it securely in the position shown in preparation for stapling.
Step 33
While holding the corner in position, insert several staples as shown.
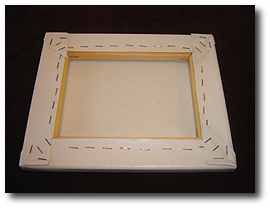
Step 34
Repeat steps 30 through 33 on the remaining three corners. Be careful that your folded edges are always on along the side stretcher bars. Your finished assembly should look like this when viewed from the back. Now use your hammer to insert all staples fully.
Step 35
You have completed the 8×10 canvas stretching tutorial. Congratulations!
Concluding Thoughts
Please see our 16×20 Canvas Stretching Tutorial, a companion article to this 8×10 Canvas Stretching Tutorial, and learn about using canvas stretching pliers.
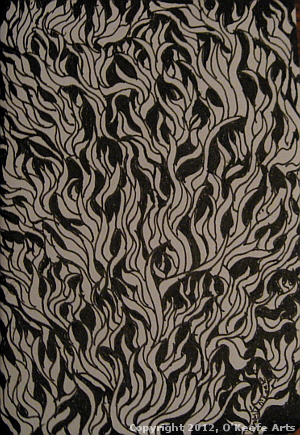
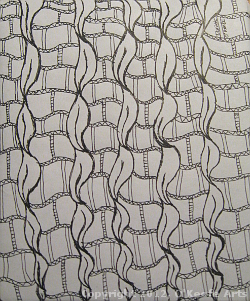
2012 Was pretty laid back for Danielle with respect to drawing. Some years were harder than others because of health complications with Danielle’s Epidermolysis Bullosa. When she did draw many times it was to relieve stress and anxiety from not feeling well. Her artwork was very expressive in design and pattern motifs, and not the focused and highly detailed drawings from her previous year. Please enjoy these drawings during Danielle O’Keefe’s year of artistic expression.
Danielle O’Keefe’s Year of Artistic Expression – Pattern Drawings
“Pattern 1” Pen & Ink on Paper, Danielle O’Keefe, 2012 (16 years old)
“Pattern 2” Pen & Ink on Paper, Danielle O’Keefe, 2012 (16 years old)
Before we start the Winsor & Newton Dammar Varnish Tutorial:
When to Varnish: Never apply final varnish to an oil painting unless thoroughly dried. Oil painting requires anywhere from 6 to 12 months (or longer) to dry, depending on the thickness of the paint. If you want to add a temporary finish to paintings that have not dried thoroughly, you should consider using a retouch varnish.
When Not to Varnish: If you have large sunken, i.e., dull and flat, areas on your original unvarnished oil painting, consider oiling out the painting before applying a final varnish. Varnishing will even out the finish on paintings that are reasonably even already, but if you have areas that are high gloss along with sunken sites “due to variations in the types of pigments and mediums used”[1], then applying a final varnish may not even out the finish as you might be expecting. Oiling out is suggested in such a case. If you decide to oil out your painting, you will need to wait an additional six months before applying your final varnish, and it’s best to perform the oiling out process shortly after completing your painting within the first few weeks.
In this tutorial, we will accomplish the following:
Learn a method for applying multiple thin coats of varnish.
Learn a brushing technique that will minimize uneven brush strokes that could be visible in the final product.
Achieve a high gloss finish similar to many paintings in museums, sometimes called a museum finish.
Additional points to remember when varnishing:
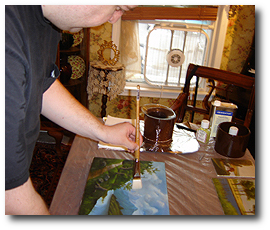
Use Good Ventilation: You will notice in the images used throughout this tutorial that I am working next to a window and using a fan to keep the air moving. Varnishing per this tutorial can take one to two days, so ensure your work area is adequately ventilated to prevent fumes from building up.
Brush Selection: The largest painting varnished in this tutorial is 12″x16″, and the smallest is 4″x6″. I chose a fine bristled brush that is 1″ wide. For paintings larger than 12″x16″, you should use a brush with a width in the 1-1/2″ to 3″ range. Only be cheap when purchasing a varnishing brush if you want to pick bristles from your varnish. Also, once you use a brush for varnishing, DO NOT use it for painting; if you have a brush you previously used for painting, DO NOT use it for varnishing. Purchase a varnishing brush that will only be used for this purpose.
Winsor & Newton Dammar Varnish:“You will need some Dammar varnish thinned 50% with turpentine. Turpenoid or mineral spirits will not dissolve the Dammar; it must be real turpentine.”[1] I used Winsor & Newton Dammar Varnish for this tutorial, which comes pre-thinned (50% Dammar / 50% genuine turpentine). It is ready to be applied from the jar without further thinning. DO NOT shake your jar of Dammar because this could cause air bubbles to form in the varnish, which you want to avoid.
We are ready to start this Winsor & Newton Dammar Varnish Tutorial by John O’Keefe Jr. & Kate (Nelson) O’Keefe.
Step-By-Step – Winsor & Newton Dammar Varnish Tutorial
Step 1
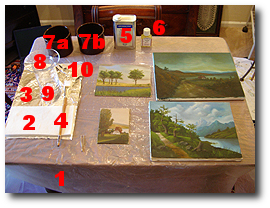
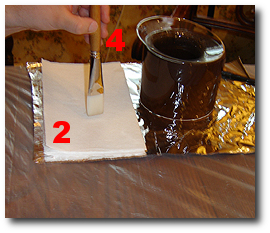
Assemble all materials and tools before starting.
1. Plastic Sheet
2. Paper Towel
3. Aluminum Foil Sheet
4. Varnishing Brush
5. Pure Turpentine
6. Dammar Varnish (Winsor & Newton)
7a. Ceramic Bowl (#1)
7b. Ceramic Bowl (#2)
8. Glass Pot for Dammar Varnish
9. Glass Container for brush cleaner
10. Tweezers
11. Unvarnished Painting(s)
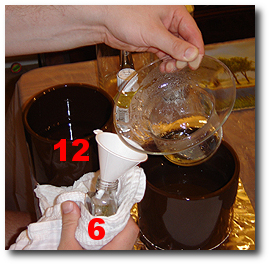
12. Small Funnel (not shown)
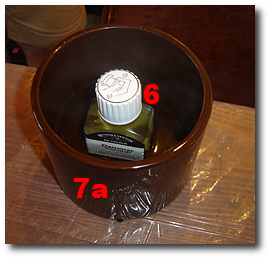
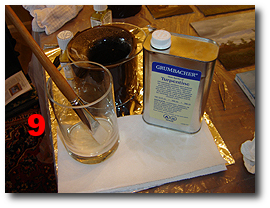
Step 2
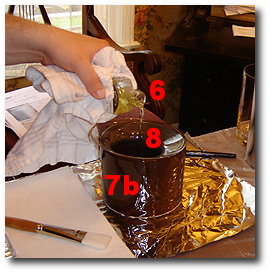
Heat some water until almost boiling, and pour some hot water into the first ceramic bowl (item 7a).
“Be careful not to scald yourself with the hot water.”
Fill the ceramic bowl with enough water that the jar of Dammar Varnish (item 6) sits primarily submerged. Let the Dammar warm for about 5-10 minutes. Warming the Dammar will lower its viscosity without adding more turpentine, making applying easier. I recommend using a ceramic bowl because of the heat-retaining properties of ceramic – you want to keep the Dammar warm until you have finished applying a thin coat of varnish to your painting(s).
I have seen another tutorial using Winsor & Newton Dammar Varnish where the warming process I described was not used. In that tutorial, the Dammar was poured directly into a pot (without warming) and applied directly onto the canvas with a brush. The warming procedure I describe in this tutorial seems relatively common in other varnishing tutorials. With that said, some words of caution: “Varnish is highly flammable, so DO NOT use electric heating/warming devices while using varnish!” [1] The hot water method seems to be a widely accepted and safe alternative.
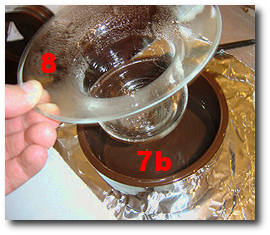
Step 3
Before removing the jar of Dammar warming in the first ceramic bowl, pour fresh hot water (not boiling) into the second ceramic bowl. (item 7b)
“Be careful not to scald yourself with the hot water.”
Insert the glass pot (item 8) into the ceramic bowl with the hot water, ensuring that the glass pot is sufficiently submerged under the water.
You can use a different style container than I am using as long as the pot fits into the warming bowl without displacing too much hot water and has a large mouth to accept your varnishing brush. (See reference photo below that shows another artists setup)
The setup used by Jamie Williams Grossman in his tutorial “How to Varnish an Oil Painting.”[1]
Step 4
Pour some of the warmed Dammar Varnish from the jar (item 6) into the glass pot (item 8) that is sitting in the warming bowl (item 7b):
“Notice I am holding the jar of Dammar with a cloth rag. Remember, the jar has been sitting in hot water.”
I used a 75ml Winsor & Newton Dammar Varnish jar and poured approximately 37ml into the glass pot. Generally, have at least 1/2″ of varnish in your pot. “Every time I add more varnish to the pot, I also change the hot water that the jar warms in(step 2)and the hot water that the pot sits in(step 3) to maintain the varnish temperature.”[1]
Step 5
Dip your brush (item 4) into the heated Dammar and lightly wipe each side of the loaded brush against the side of the glass pot (item 8) to remove excess Dammar:
If you begin brushing with an overloaded brush, you might develop a puddle of varnish on your canvas, and your coating will likely be too thick. On the other hand, if you remove too much varnish from the brush, you will not get enough coverage, and your brush will run dry before you can make one pass across the canvas.
Step 6
Using the paper towel (item 2), touch the tips of the bristles to remove excess Dammar from the tip of the brush (item 4):
You might think that removing all this excess Dammar from the brush will leave us with too little varnish to cover the canvas. Our goal in steps 5 and 6 is to remove excess varnish, prevent puddling on the canvas, and prevent applying too thick of a varnish coating at once. At the same time, we want enough varnish in the brush so that we do not run dry halfway across the canvas as we move the brush from one side of the painting to the other. The technique we are trying to develop in this tutorial is the application of multiple thin coats of varnish.
With practice, you will learn how much excess Dammar to remove from your brush to prevent either of these situations.
Step 7
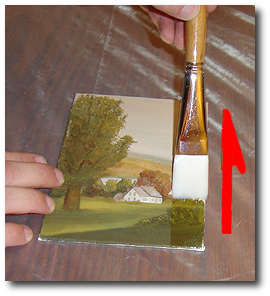
Before we start applying varnish, let me explain the process briefly. We will apply varnish first in columns (along with the vertical axis of the painting) and then in rows (along with the horizontal axis of the image). We will brush on the varnish one column at a time, first in one direction, then back over the same brush stroke in the opposite direction. Once we cover the entire painting this way, column by column, reloading the brush with each back-and-forth pass, we will rotate the painting 90 degrees and repeat the brush strokes in the same back-and-forth pattern along the horizontal axis, row by row, but this time without reloading the brush with fresh varnish after each pass.
I have listed Winsor & Newton’s recommended application method for their Dammar Varnish: [2]
Apply the varnish in 1-3 thin coats rather than one thick coat. A thick coating will take longer to dry, may dry cloudy, drip, or sag during the application, and has a greater chance of showing brush strokes when dry.
Thinned varnish is more susceptible to producing bubbles. Refrain from being vigorous in your application.
Apply long, even strokes to cover the surface from top to bottom while moving from one side to the other. While working, inspect the varnish layer at all angles for bubbles. Even them out immediately.
Once you leave an area, stay within areas that you have done. If you do, you risk dragging partially dry resin into wet, which will dry cloudy over dark colors. Allow drying completely before doing any revarnishing.
Starting at one of the corners of your canvas, place your brush into position and in one long brush stroke across the painting. Make one long, even brush stroke from one side to the other side, and then leave it alone. Do not stop part way through. Do not return to touch up a spot you feel could be better unless you see a drastic problem, like large areas of no varnish or bubbles.
Reminder: Even though we have warmed the Dammar, we need to work quickly because once applied to the canvas, the Dammar will begin setting immediately. After about 10 minutes, the varnish will be tack dry.
Step 8
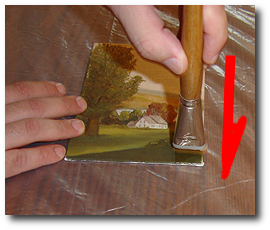
After reloading the brush, make another long stroke in the opposite direction, directly over your first brush stroke. As we did with the first brush stroke, move the brush in one long, even stroke from one side to the other. (Note: I always apply my first strokes along the vertical plane when varnishing landscape. When I rotate the canvas to pass over the first varnish coating, I move the brush along the horizontal plane.)
Step 9
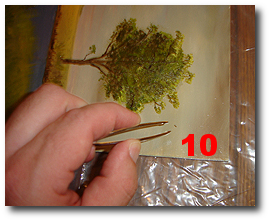
Make a brief scan of your progress after each back-and-forth pass of the brush to ensure you’re getting even coverage. If you see large uncovered areas as you move across the painting, you probably removed too much varnish from the brush during steps 5 and 6.
However, if everything is going well, you should start seeing the difference the varnish has in the oil painting’s appearance. Notice how the colors are popping as if they were just freshly painted. (see step 9 image)
Repeat steps 5 through 8 until you have completely coated the painting with varnish. When starting a new row, you should overlap your new strokes slightly with the previous ones. The next step (10) is crucial for smoothing out the coating of varnish that you just applied.
Step 10
Rotate your painting so that you will be working in the horizontal plane. Without reloading your brush, start at one corner, straight across the canvas without stopping, and then brush back over your stroke in the opposite direction. Repeat this until you have gone over the entire painting. This step will help to distribute the Dammar more evenly across your canvas.
Step 11
At any point during the application of the Dammar Varnish, you might find a piece of debris has fallen onto the canvas. Using the tweezers (item 10), gently remove the contaminant while trying not to disturb the varnish.
Step 12
Once you have completed coating your painting with varnish, place your brush into a container (item 9) with turpentine. You want to keep the varnish from hardening onto your brush while you wait for the varnished paintings to dry enough to continue with the second and third coatings.
Step 13
Varnish is reusable, so you should pour, using a funnel (item 12), whatever you have not used back into its original jar (item 6). I recommend doing this between varnish coats. Let the applied varnish dry for a minimum of two hours between coats. However, the time might vary depending on the temperature and humidity in your area. If the varnish is tacky to the touch, it’s not ready for a second or third coating. I test my varnish by pressing a finger along the edge of the canvas. If I see a fingerprint, it’s not ready. One source said you could wait a day between varnish coatings.
If you apply two or more coats of varnish, please start this tutorial from the beginning, working on each new coat of varnish as if it were the first. This would mean starting again at step 2.
Step 14
After about 10 minutes, the varnish should be tacky enough not to run or drip. Kate is here holding up the painting after she examines the varnish. Problem spots will be visible when looking across the surface of the canvas at eye level. Missed spots or uneven brush strokes will be visible. During this examination, you will decide if another coat of varnish is needed. “If needed, apply a second [or third coat] to fix rough areas after they dry. Do not try to fix areas by themselves, but apply a full second [or third coat] of the varnish.”[3] I have found that three coats of varnish give me the best results.
Concluding Thoughts
Here I am varnishing another painting. I like to have several oil paintings ready before I start a varnishing session. Applying two to three coats of varnish can take one to two days, so I like to have several paintings ready. As I finish varnishing one, I move it aside and start my second, third, and so on. I then let them all dry together. I hope you enjoyed this Winsor & Newton Dammar Varnish Tutorial by John O’Keefe Jr. & Kate (Nelson) O’Keefe.
Footnotes:
Jamie Williams Grossman, www.wetcanvas.com, “How to Varnish an Oil Painting.”
David Pyle, www.winsornewton.com, “The Last Layer: The Why, What, When, and How of Varnishing.”
Jeff Beer, “How to Simply Varnish an Oil Painting.”
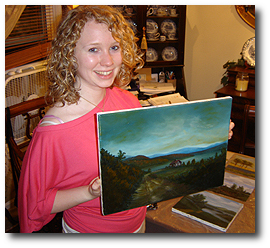
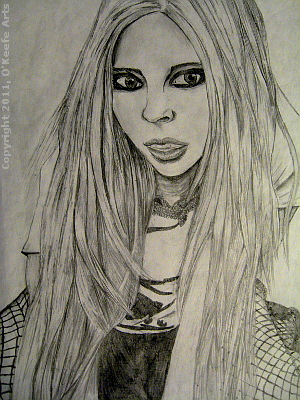
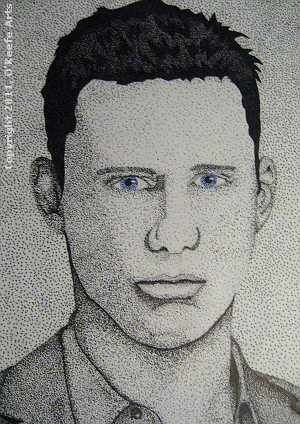
2011 was by far Danielle O’Keefe’s year of artistic growth. Her drawings are much more realistic, with greater depth and perspective. Her portraits “Avril Lavigne” and “Study in Pointillism” really demonstrate her improved understanding of the human face and form. It was with the aid of school art lessons, as seen in her drawings “Colored Pencil Study 1” and “Perspective Study 1“, that she took her skills to the next level.
Danielle O’Keefe’s Year of Artistic Growth – Realistic Drawings
“Avril Lavigne” Graphite on Paper Danielle O’Keefe 2011 (15 years old)
“Study of Pointillism” Pen & Ink on Paper Danielle O’Keefe 2011 (15 years old)
“Colored Pencil Study 1” Colored Pencil on Paper Danielle O’Keefe, 2011 (15 years old)
“Perspective Study 1” Graphite on Paper Danielle O’Keefe, 2011 (15 years old)