Neoclassical Louis XVI or Neoclassical Empire Frame

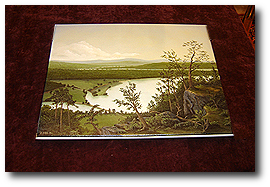
Jennifer and I went antiquing today at The Collinsville Antiques Company of New Haven and Antiques on the Farmingtonboth located in Collinsville, Connecticut. First, I always look for suitable quality antique frames whenever we go antiquing. On this day, we came across two noteworthy frames. One of the frames was a nice Neoclassical Louis XVI, or Neoclassical Empire Frame mounted to a 19th-century oil painting on canvas. The second frame was a Transitional Louis XV/Louis XVI Rococo Frame Reproduction. In this post, I will discuss the Neoclassical frame.

Neoclassical Frame

Neoclassical Frame with Waterfall Oil Painted Scene
Neoclassical Frame with Waterfall Oil-Painted Scene

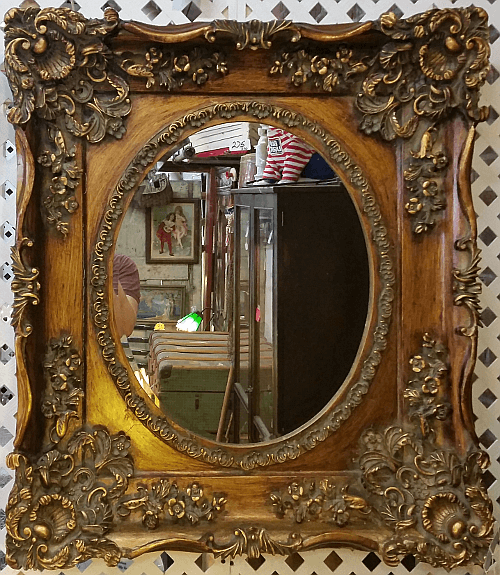
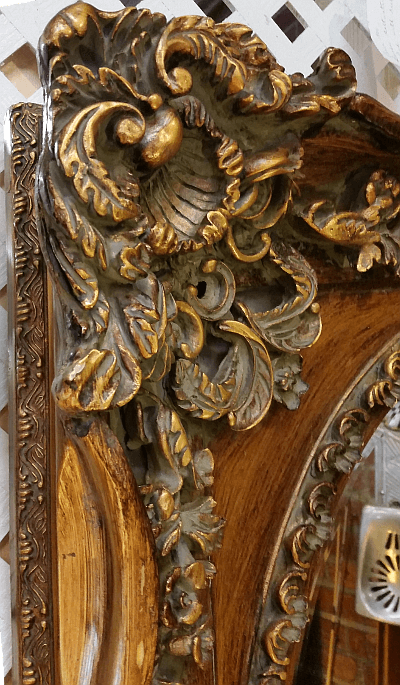
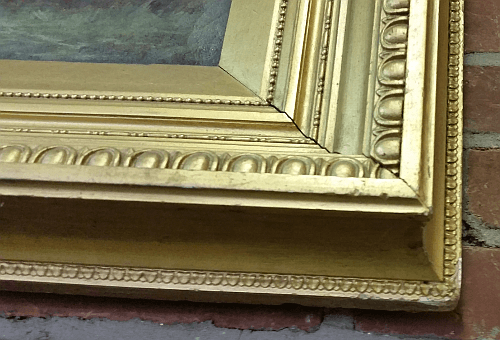
Some of this frame’s notable Neoclassical design elements include the bead pattern, double-bead and reel pattern, plain cove, and the, most important, egg and dart pattern at the top edge. Also, the outer edge has a rais-de-Coeur design all around. (As seen in the last image at the bottom.)

Neoclassical frame - corner close-up
Neoclassical Frame – Corner close-up

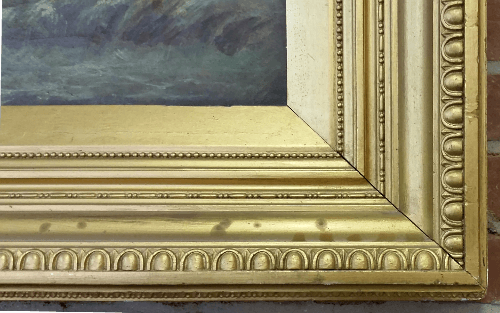
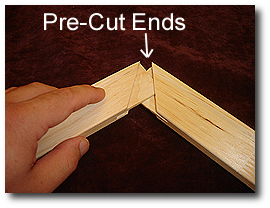
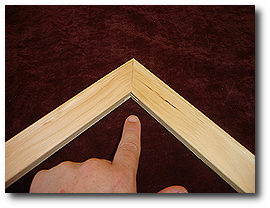
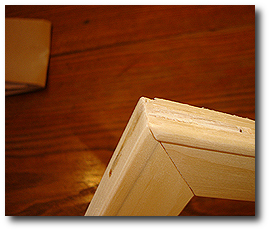
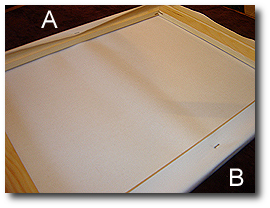
Picture frame molding is often pre-fabricated in lengths up to 8 feet long that are measured, cut to the proper size, and joined at the corners. One telltale sign of this type of frame construction is mismatched design patterns and a visible corner seam, and these identifying features are also known as “open corners.”

Neoclassical style frame - corner close-up showing rais-de-coeur.
Neoclassical Frame – Corner close-up showing rais-de-Coeur

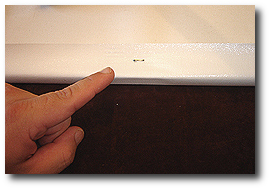
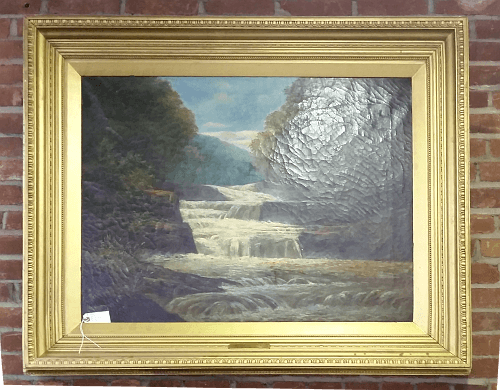
Overall, this Neoclassical Louis XVI or Neoclassical Empire Frame is in excellent condition and has no significant losses to the compo ornamentation. The finish is original and consistent throughout, with no overpainting or touchups. There are some minor stains along the bottom rail. Also, check out the Transitional Louis XV/Louis XVI Rococo Frame Reproduction from the same shop.

Transitional Louis XV/Louis XVI Rococo Frame Reproduction

Antiques on the Farmington in Collinsville, Connecticut had this fairly large Transitional Louis XV/Louis XVI Rococo frame reproduction. First of all this frame does not appear to be old, but it has the look and feel of the Rococo period. The Rococo “transitional” period lasted from c.1760 to c.1770, for those interested in knowing when in history you might have seen an original transition frame similar to this one.

Rococo Frame Reproduction

Transitional Louis XV - Louis XVI Rococo Frame Reproduction
Rococo Frame Reproduction

The most noteworthy Rococo-style features on this reproduction are the oval sight, elaborate corner foliate cartouches and swept sides and back. A nice contrast between the antiqued gold ornamentation and the faux wood finish on the inner portions of the frame are visible. In my experience however, I have not come across an authentic frame like this with different gold and wood areas.

On the subject of reproduction frames, I have found there are two kinds. The first kind will have features that can be linked directly back to the time-period in question. The second kind I would not call true reproductions. Some frame makers will take design elements from many periods and mash then together in such a way that you can’t tie it back to any specific historical period. For example, they might have Baroque Louis XIII features mixed with Neoclassical Louis XVI features. Now I don’t mean to imply that the latter can’t look good in their own right. I’m just saying there are true reproductions and “other” frames with old design elements incorporated into their designs. I believe this frame falls under the true reproduction kind.

Rococo frame reproduction - corner close-up showing faux wood finish.
Corner close-up showing faux wood finish.

In conclusion, I like this Transitional Louis XV/Louis XVI Rococo frame reproduction despite it being newer. A formal oil portrait would go nicely with this style of frame, with the mirror removed. (We also found a Neoclassical Louis XVI or Neoclassical Empire Frame.)

Danielle O’Keefe’s Year of Experiments (2014)

Danielle tried oil painting for the first time in 2014. Oils were a different feel for her, and she realized very quickly that it was not as easy to control the medium as others that she had already mastered. It was around this time that Danielle expressed an interest on body art, i.e. tattoo design. Starting this year her drawings started going in that direction. We have dubbed 2014 as Danielle O’Keefe’s year of experiments.

Danielle O’Keefe’s Year of Experiments – Trying New things

Danielle O'Keefe's Year of Experiments, Self Portrait 1, Oil on Board (1st Oil Painting), Danielle O'Keefe, 2014
“Self Portrait 1”
Oil on Board (1st Oil Painting)
Danielle O’Keefe
2014 ;(18 years old)
Danielle O'Keefe's Year of Experiments, Patterned Flowers, Oil on Board (2nd Oil Painting), Danielle O'Keefe, 2014
“Patterned Flowers”
Oil on Board (2nd Oil Painting)
Danielle O’Keefe
2014 (18 years old)
Danielle O'Keefe's Year of Experiments, Chinese Butterfly, Sharpie on Paper, Danielle O'Keefe, 2014
“Chinese Butterfly”
Sharpie on Paper
Danielle O’Keefe
2014 (18 years old)
Danielle O'Keefe's Year of Experiments, Tattoo Study, Pen & Ink & Graphite on Paper, Danielle O'Keefe, 2014
“Tattoo Study”
Pen & Ink & Graphite on Paper
Danielle O’Keefe
2014 (18 years old)

“Tattoo Study” did not come out as Danielle hoped for, and she wanted to toss the artwork before it was done. I had her finish it despite her early disappointment, and told her to look at the experience as an opportunity to 1) finish what she started, and 2) practice ways to overcome mistakes. She could not correct the eyes and mouth area, but she did complete the rest of the piece to her credit.

Danielle O'Keefe's Year of Experiments, 11th Doctor Portrait (Matt Smith), Sharpie on Paper, Danielle O'Keefe, 2014
“11th Doctor Portrait (Matt Smith)”
Sharpie on Paper
Danielle O’Keefe
2014 (18 years old)

Tutorial for Framing an Oil Painting by John O’Keefe Jr.

Tutorial for Framing an Oil Painting by John O'Keefe Jr.

This framing tutorial for an oil painting demonstrates a technique for mounting an original oil painting to a Hudson River School style, solid wood with compo, reproduction frame. The painting is entitled “Moment of Reflection” by John O’Keefe Jr. and is 6″ by 12″ in size. The hardware for this project includes D-Ring Hangers, Coated Hanging Wire, Rabbet Felt, and Canvas Offsets. The combined frame, hardware, and painting weight is approximately 10 pounds, and the hardware is specified accordingly.

Important Disclaimer…

Please read each of the below steps carefully and refer to the accompanying images. This tutorial (and the specified hardware) is recommended for this specific painting size and frame weight but can be adapted for any frame and painting weighing 8 to 12 pounds.

Framing D-Ring Hangers and Wire

Step 1

Tutorial for Framing an Oil Painting - Step 1 - Assemble all Materials

Assemble all materials and tools before starting.

  1. Tape Measure
  2. Wire Cutters
  3. Screw Driver
  4. Hanging Wire (#5 Coated Stainless Steel Wire – Rated for 43 lbs.)
  5. D-Rings & Wood Screws (2-Hole D-Ring Hangers Rated for 30 lbs. ea.; #6 x 1/2″ Wood Screws)
  6. Frame (not shown)
  7. Soft Cloth Work Surface (not shown)

Step 2

Hanging Hardware - Step 2 - Measure Apex of Hanging Wire

Thoroughly clean the rear of the frame of all debris and wood burrs. Next, mark the wire apex location: It is essential to set the apex sufficiently below the top edge of the frame so that wall-hanging hardware will not be visible from the final viewing position.


Step 3

Hanging Hardware - Step 3 - Measure Vertical D-Ring Position

Positioning D-Ring hangers at approximately 1/3 of the overall frame height from the top edge is recommended. (In our example, that distance is about 5-1/4″ from the top edge.) Mark the distance as shown. Repeat on the opposite side of the frame.


Step 4

Hanging Hardware - Step 4 - Measure Horizontal D-Ring Position

The distance from the outside edge to the location of the outer D-Ring mounting screw should be approx 1″, but this distance can vary depending on the construction method and width of the frame. (Our D-Ring is approx. 2-1/4″ long, and our frame width is over 5″, so the 1″ distance is appropriate.) Mark the distance as shown. Repeat on the opposite side.


Step 5

Hanging Hardware - Step 5 - Attach First D-Ring Hanger

Install the first D-Ring hanger starting with the exterior wood screw position mark from step 4. Depending on the density of your wood frame, you might need to drill pilot holes before installing your wood screws – our frame’s wood is soft enough that the screws are installed without pilot holes. The D-Ring hanger should be angled so that the plane between the outer and inner wood screw holes intersect with the estimated wire apex position from step 2 – see image at left. Install the inner wood screw as shown.


Step 6

Hanging Hardware - Step 6 - Attach Second D-Ring Hanger

As in step 5, position the second D-Ring hanger at the proper angle and install wood screws, starting with the outer wood screw.

Our D-Ring hangers are of the two-hole style and are rated for 30 lb, which is about three times the total weight of our project – over-specifying is better. We recommend using D-Ring hangers with two or more holes made of steel. We use Zinc plated steel D-Rings in this project.


Step 7

Hanging Hardware - Step 7 - Attach Hanging Wire to First D-Ring with Lark's Head Knot

Starting with the first D-Ring, loop the wire into a Lark’s Head knot (see step-by-step diagram below) with 7 to 10 twists and cut ends. Important note: Do not leave the end of the wire dangling – cut it close to twists as shown. Dangling wire ends can poke into the painting from the rear resulting in a dent in the canvas or worse. Use galvanized braided steel wire rated for at least four times the frame’s weight, artwork, and hardware. (The hanging wire on our example is a coated #5 braided steel rated for 43 lbs.)

Tutorial for Framing an Oil Painting - Step 7 - Lark's Head Knot Step-By-Step Instructions

Step 8

Hanging Hardware - Step 8 - Apply Tension to Hanging Wire Just Below Apex Position

Pull the wire through the second D-Ring loop (without making a knot) while holding the wire just below the apex position – pull the hanging wire tight (as shown in the image) until the wire sets at the 2nd D-Ring position. You now have a bend in the hanging wire as a reference starting location for step 9.


Step 9

Hanging Hardware - Step 9 - Attach Hanging Wire to Second D-Ring with Lark's Head Knot

Form the second Lark’s Head knot (using the diagram from step 7) as shown.


Step 10

Hanging Hardware - Step 10 - Remove Slack From Hanging Wire By Pulling to Apex Position

After forming both Lark’s Head knots, pull the wire tightly to the apex position until all slack is removed. Your frame is ready for hanging!

Framing Rabbet Felt Strips

Step 1

Tutorial for Rabbet Felt - Step 1 - Assemble all Materials

Assemble all materials and tools before starting.

  1. Tape Measure
  2. Scissors
  3. Rabbet Felt Strips (1/4″ Wide Adhesive Backed Decco-Felt Strips)
  4. Frame (not shown)
  5. Soft Cloth Work Surface (not shown)

Step 2

Tutorial for Rabbet Felt - Step 2 - Cut Fell Strips to Rabbet Lengths

Cut Felt strips to match the Rabbet width and height dimensions, and dry fit pieces into place – two strips cut to the Rabbet Height dimension and two strips at the Rabbet Width dimension – as shown. (Note: There will be a slight overlap of rabbet felt at the corners, which gets corrected in step 3.)


Step 3

Tutorial for Rabbet Felt - Step 3 - Cut 45 Degree Chamfer to Felt Strip Ends

After dry-fitting the Rabbet Felt strips, cut a 45-degree chamfer at each end, as shown.


Step 4

Tutorial for Rabbet Felt - Step 4 - Remove Adhesive Backing and Install Felt Strips into Rabbet

Install Rabbet Felt strips on all sides after peeling back the adhesive backing.


Step 5

Tutorial for Rabbet Felt - Step 5 - Check that Felt Strip Corners Do NOT Overlap

After installing Rabbet Felt strips on all sides, check that corners do not overlap – However, small gaps between the Felt in the corners it acceptable.

Why take the extra precaution of adding Rabbet Felt?

Tutorial for Framing an Oil Painting - Example of Rabbet Damage to Unprotected Painting Surface

Framing Canvas Offset Clips

Step 1

Tutorial for Offset Clips - Step 1 - Assemble All Materials

Assemble all materials and tools before starting.

  1. Screw Driver
  2. Canvas Offsets (3/8″ Zinc Plated Steel)
  3. Artwork (not shown)
  4. Frame (not shown)
  5. Soft Cloth Work Surface (not shown)

Step 2

Tutorial for Offset Clips - Step 2 - Fit Painting into Frame Rabbet

Place the painting into the Rabbet opening, seating the face of the artwork onto the Rabbet Felt strips applied earlier.


Step 3

Tutorial for Offset Clips - Step 3 - Attach Offset Clips Roughly 4 to 6 Inches Apart

Install Canvas Offsets about 4-6″ apart, as shown in the image. Only install wood screws into the wood frame, not the stretcher bars of the artwork.

Closing Notes…

I hope this tutorial for framing an oil painting was helpful. If you have questions, feel free to ask a question in the reply section below, and I will respond, or contact me directly using the contact information in the above “CONTACT” menu link.

16×20 Canvas Stretching Tutorial by John O’Keefe Jr.

This 16×20 canvas stretching tutorial focuses on a giclee print on canvas. However, the steps can also be applied to any medium-sized canvas, whether raw, primed, or painted. I provide tutorials like this for free because I feel that all of us should be able to enjoy creating art without all the “extra costs” that many would charge for this level of information.


16×20 CANVAS STRETCHING – MATERIALS AND TOOLS

Step 1

16 x 20 Canvas Stretching - Step 1 - Assemble all materials

Before starting, Assemble all materials and tools for the 16×20 canvas stretching tutorial.

  1. Cloth Work Surface
  2. Giclee Print (not shown)
  3. Pre-Made Stretcher Bars
  4. Square Ruler
  5. Mallet
  6. Small Hammer
  7. Flathead Screwdriver
  8. Staple Gun
  9. 1/4″ Staples
  10. Tape Measure
  11. Canvas Pliers
  12. Pencil

CANVAS STRETCHING – APPLY GLUE TO STRETCHER BARS

NOTE: (Steps 2 through 4 are optional)

Step 2

16 x 20 Canvas Stretching - Step 2 Optional - Elmer's Carpenter's Wood Glue

     We will use Elmer’s Wood Glue to bond the stretcher bars ends together. Because we are using pre-made stretcher bars that come ready to assemble, we may need to sand rough edges that have resulted from the cutting tools used during the manufacturing process.


Step 3

16 x 20 Canvas Stretching - Step 3 Optional - Apply Elmer's to stretcher bar corner

Apply a small amount of glue to each end, as shown. Repeat this for each stretcher bar before continuing to the next step.


Step 4

16 x 20 Canvas Stretching - Step 4 Optional - Spread glue using fingers

Using your finger, spread the glue around each cut end’s surface, as shown. Repeat this for the remaining stretcher bars.

CANVAS STRETCHING – ASSEMBLE THE STRETCHER BARS

Step 5

16 x 20 Canvas Stretching - Step 5 - Assembly first two stretcher bars

Begin mating the stretcher bars.


Step 6

16 x 20 Canvas Stretching - Step 6 - Ensure stretcher bars have a snug fit

Make sure that you fully seat the stretcher bar ends. If you see a gap along the seam where the ends meet, you have not fully mated the two bars.


Step 7

16 x 20 Canvas Stretching - Step 7 - Assemble remaining stretcher bars

In this view, all four stretcher bars are shown mated together. However, we must ensure that all four corners of this assembly are square before the glue sets. (i.e., A, B, C, & D)


Step 8

16 x 20 Canvas Stretching - Step 8 - Wipe off excess glue if it was applied

If you used glue (as shown in steps 2 through 4), wipe off any excess glue that has squeezed out while mating the stretcher bars.


Step 9

16 x 20 Canvas Stretching - Step 9 - Measure diagonal corners (A-B)

Measure the distance between corner A and corner B.


Step 10

16 x 20 Canvas Stretching - Step 10 - Measure opposite diagonal corners (C-D)

Measure the distance between corner C and corner D.

Compare the two distances against each other. If the distances AB and CD are equal, you are square. If they are not equal, you are not square.

(In our example, distance AB was 0.125 inches larger than distance CD, and we need to make adjustments as shown in steps 11 and 12.)


Step 11

16 x 20 Canvas Stretching - Step 11 - If not square adjust using mallet

While firmly holding the stretcher bar assembly, tap the corner with a mallet with the largest measurement.

(In our example, we will tap corner A.)


Step 12

16 x 20 Canvas Stretching - Step 12 - Recheck squareness using a square

Recheck all corners to make sure they are square. We can use the earlier tape measure or square ruler method shown here.

Hold the square ruler as shown and check that both inside edges of the ruler run flush along the surface of each stretcher bar. You are not square if the ruler lifts off on one side (not running flush along the entire surface). Repeat this check on all the remaining corners. If your stretcher bar assembly is square, you are ready to start the canvas mounting process.


Step 13

16 x 20 Canvas Stretching - Step 13 - Sand stretcher bar corners

Using light-grade sandpaper, gently remove any rough or broken wood from corners.


Step 14

16 x 20 Canvas Stretching - Step 14 - Inspect that no jagged edges exist

Ensure the corners are thoroughly sanded, and no rough edges remain.

CANVAS STRETCHING – PREPARE FOR STAPLING

Step 15a

16 x 20 Canvas Stretching - Step 15 - Soft cloth workspace

Before laying down your giclee canvas print, make sure there are no debris or wood pieces (that may have fallen off during stretcher bar assembly) that could damage the printed surface. A soft cloth work surface minimizes the chances of causing minor scratches to your giclee canvas print.


Step 15b

16 x 20 Canvas Stretching - Step 15 - Clean work surface and inspect canvas print for damage

Lay down your print (face up) and make a final close examination to ensure it has no damage.


Step 16

16 x 20 Canvas Stretching - Step 16 - Put canvas print face down onto work surface

Turn over your giclee print at this point, so the image is face down. You are now ready to position your stretcher bar assembly.


Step 17

16 x 20 Canvas Stretching - Step 17 - Place assembled stretcher bars onto canvas print

Place your stretcher bar assembly over your giclee canvas print as shown.

16×20 CANVAS STRETCHING – STRETCHING AND INSTALLING FIRST STAPLES

Step 18

16 x 20 Canvas Stretching - Step 18 - Align stretcher bars with image outline

Starting with the right side, carefully lift the canvas print and ensure the image is wrapped around the front face of the stretcher bar. Repeat this on the opposite side, moving the stretcher assembly left or right until you see the image wrapping equally around both sidebars.


Step 19

16 x 20 Canvas Stretching - Step 19 - Mark canvas with pencil along stretcher bars

Once you are sure that you have centered the stretcher bar about the printed image, draw a reference line along each side as shown. This reference line will be helpful later if the stretcher assembly moves out of position and you need to realign it.


Step 20

16 x 20 Canvas Stretching - Step 20 - Check that pencil mark aligns with image

As we did in Step 18 for the side positioning, we want to center the stretcher bar assembly along the top and bottom bars. Carefully lift the canvas print and ensure the image is wrapped around the front face of the bottom stretcher bar. Repeat this for the top stretcher bar, moving the stretcher assembly up or down as needed until you see the image wrapping equally around the top and bottom bars.


Step 21

16 x 20 Canvas Stretching - Step 21 - Mark remaining canvas on all side with pencil along stretcher bars

Once you are sure that you have centered the stretcher bar about the printed image, draw a reference line along each side as shown. We have now centered the stretcher bar assembly in both the vertical and horizontal directions concerning the printed image. We are ready to begin the canvas stretching, wrapping, and stapling processes.

16×20 CANVAS STRETCHING – STRETCHING AND INSTALLING FIRST STAPLES

Step 22a

16 x 20 Canvas Stretching - Step 22a - Prepare staple gun for canvas attachment to stretcher bars

For this example, we have selected 1/4″ staples. Load your staple gun, so you stay supplied with staples partway through the following steps.


Step 22b

16 x 20 Canvas Stretching - Step 22 - Wrap canvas around first stretcher bar

Starting with the top stretcher bar, wrap the giclee canvas print around the stretcher bar as shown. Ensure the stretcher assembly has not moved out of the reference lines we drew earlier.


Step 23

16 x 20 Canvas Stretching - Step 23 - Staple canvas in center of first stretcher bar

Holding the staple gun squarely on the canvas and stretcher bar, staple the canvas to the stretcher bar in the center of the bar as shown.


Step 24

16 x 20 Canvas Stretching - Step 24 - Inspect staple and ensure it seated into stretcher bar

Check that your assembly looks like this – having one staple in the center of the top stretcher bar.


Step 25

16 x 20 Canvas Stretching - Step 25 - Wrap canvas on opposite side and grip with canvas pliers

While firmly holding the canvas pliers, grip the canvas in the center of the bottom stretcher bar, opposite from the first staple in the center of the top stretcher bar.


Step 26

16 x 20 Canvas Stretching - Step 26 - Apply tension using canvas pliers

Using the stretcher bar as leverage, rock the canvas pliers forward (compare images from steps 25 and 26) until the canvas has stretched – notice that the canvas is tightly wrapped around the stretcher bar.


Step 27

16 x 20 Canvas Stretching - Step 27 - Firmly hold canvas in position with thumb

Before releasing the canvas pliers, press your thumb onto the canvas. Holding your thumb in this manner will maintain canvas tension during staple insertion.


Step 28

16 x 20 Canvas Stretching - Step 28 - Staple canvas to center of stretcher bar

While firmly pressing your thumb on the canvas, insert one staple while maintaining tension. Hold the staple gun squarely on the canvas and stretcher bar and staple the canvas to the stretcher bar in the center of the bar as shown.


Step 29

16 x 20 Canvas Stretching - Step 29 - Inspect second staple to ensure its properly seated

Check that your assembly looks like this – having one staple in the center of the bottom stretcher bar.


Step 30

16 x 20 Canvas Stretching - Step 30 - Look for canvas tension ridge between first two staple points

Once you have inserted the first two staples into the top and bottom stretcher bars as shown you should notice a slight tension pull on the canvas between the two staple points (i.e., points A and B.)


Step 31

16 x 20 Canvas Stretching - Step 31 - Using canvas pliers stretch and staple canvas to center of third stretcher

Using the canvas pliers, stretch the canvas starting on the left side and hold tension, applying firm finger pressure. (…I am keeping the pliers away from my body, and this provides less stretching and leveraging control. Because I’m not applying tension for the first side staple, I chose to use the pliers this way. However, when you are stretching opposing sides it is recommended to hold the pliers so that they are facing toward your body as shown in images 25 through 28)


Step 32

16 x 20 Canvas Stretching - Step 32 - Inspect that staple is fully seated in stretcher bar

Insert one staple in the center of the side stretcher bar.


Step 33

16 x 20 Canvas Stretching - Step 33 - Stretch and staple canvas on fourth side

Repeat the stretching and stapling process as shown in steps 25 through 28. Be sure to firmly hold the canvas with your thumb before removing the pliers.


Step 34

16 x 20 Canvas Stretching - Step 34 - Inspect canvas for droops and sags

Be sure to stretch the canvas when stapling opposing sides, so it does not droop or sag. Our assembly should now have one staple placed directly in the center of each stretcher bar, as shown.


Step 35

16 x 20 Canvas Stretching - Step 35 - Ensure canvas image is square with stretcher bar assembly

Flip over the assembly to look at the printed image on the front. Check that the image is centered vertically and horizontally – you should see the image wrapping equally around all sides, and no ‘white’ border should be visible along the front face. Check that the image has not rotated clockwise or counter-clockwise so that it is no longer square with the stretcher bars. Also, check that the canvas is not overly loose or sagging. In the following steps, we will tighten the canvas as we stretch, wrap, and insert the remaining staples, but now is the time to remove the staples and make adjustments if the position of the image is off or the canvas is very loose and sagging.

16×20 CANVAS STRETCHING – STRETCHING AND INSTALLING REMAINING STAPLES

Step 36

16 x 20 Canvas Stretching - Step 36 - Using canvas pliers stretch from first staple

Beginning with the top stretcher bar (1), stretch the canvas using canvas pliers and hold tension by applying pressure with your thumb.


Step 37

16 x 20 Canvas Stretching - Step 37 - Stretch and staple to end of first stretcher bar

Insert staples starting from the center staple and moving left with each new staple until you reach the left stretcher bar, as shown. Use canvas pliers as needed.


Step 38

16 x 20 Canvas Stretching - Step 38 - Stretch canvas around second stretcher bar

Moving to the bottom stretcher bar (2), stretch the canvas using canvas pliers and hold tension by applying pressure with your thumb.


Step 39

16 x 20 Canvas Stretching - Step 39 - Stretch and staple to end of second stretcher

Insert staples starting from the center staple and moving right with each new staple until you reach the right stretcher bar as shown. Use canvas pliers as needed.


Step 40

16 x 20 Canvas Stretching - Step 40 - Stretch and staple to end of third and fourth stretchers

Repeat the previous step for the left (3) and right (4) stretcher bars in that order. Remember to start from the center staple and move toward the arrows (as shown) as you staple the remaining two sides. Use canvas pliers as needed.


Step 41

16 x 20 Canvas Stretching - Step 41 - Stretch canvas and staple at other end of first stretcher

Now begin applying more tension when stretching the canvas using the pliers. Always have the canvas pliers facing away from your body during the final stretching and stapling steps for maximum tension and leveraging control. Starting closest to the center staple on the bottom stretcher bar (1), stretch the canvas, maintain pressure with your thumb, and insert two or three adjacent staples starting from the center staple and moving left.


Step 42

16 x 20 Canvas Stretching - Step 42 - Moving toward end, stretch and staple

Move slightly to the left of the staples you just inserted in step 41, use the canvas pliers to pull the canvas tight, apply thumb pressure to maintain canvas tension, and insert two or three more adjacent staples moving in the left direction toward the left stretcher bar.


Step 43

16 x 20 Canvas Stretching - Step 43 - Moving toward end, stretch and staple

Reposition the canvas pliers closer to the left stretcher bar, pull the canvas tight using canvas pliers, maintain pressure with your thumb, and insert several adjacent staples.

Repeat this process until you reach the left stretcher bar.


Step 44

16 x 20 Canvas Stretching - Step 44 - Inspect that all staples are fully seated

After inserting staples along the bottom (1) stretcher bar, your assembly should look like this.


Step 45

16 x 20 Canvas Stretching - Step 42 - Repeat stretching and stapling on remaining sides

Repeat steps 41 through 44 for the top (2), left (3), and right (4) sides – in that order until your assembly looks like this.


Step 46

16 x 20 Canvas Stretching - Step 46 - Test tension by tapping canvas listen for drum sound

A good test to see if you stretched the canvas enough is to tap the center of the canvas with your finger and listen for a drum-like sound. If the canvas is improperly stretched and loose, it will not have this sound and flop around as you tap it. Also, if you see ripples in the canvas, you have an uneven tension problem – the canvas is not tight.


Step 47

16 x 20 Canvas Stretching - Step 47 - Fold and Wrap canvas around corner

Now we must fold and secure the four corners. Hold the corner of the canvas material as shown.


Step 48

16 x 20 Canvas Stretching - Step 48 - Ensure canvas print is stretched tight over corner

While applying tension, wrap the corner around the stretcher bar as shown so that the fold is on the side of the assembly. The fold should run at a 45-degree angle, as shown.


Step 49

16 x 20 Canvas Stretching - Step 49 - Hold wrapped canvas print tightly on back

While applying tension on the canvas material, fold it around the back face and hold it securely in the position shown in preparation for stapling.


Step 50

16 x 20 Canvas Stretching - Step 50 - Staple folded corner to stretcher bar

While holding the corner in position, insert several staples as shown.


Step 51

16 x 20 Canvas Stretching - Step 51 - Staple folded corners on remaining sides

Repeat steps 47 through 50 on the remaining three corners. Be careful that your folded edges are always on along the side stretcher bars. Your finished assembly should look like this when viewed from the back. Use your hammer to insert all staples fully.


Step 52

16 x 20 Canvas Stretching - Step 52 - Inspect and Finished

You have completed the 16×20 canvas stretching tutorial. Congratulations!

Concluding Thoughts

Please see our 8×10 Canvas Stretching Tutorial, a companion article to this 16×20 Canvas Stretching Tutorial, and learn about using canvas stretching pliers.