

This framing tutorial for an oil painting demonstrates a technique for mounting an original oil painting to a Hudson River School style, solid wood with compo, reproduction frame. The painting is entitled “Moment of Reflection” by John O’Keefe Jr. and is 6″ by 12″ in size. The hardware for this project includes D-Ring Hangers, Coated Hanging Wire, Rabbet Felt, and Canvas Offsets. The combined frame, hardware, and painting weight is approximately 10 pounds, and the hardware is specified accordingly.
Important Disclaimer…
Please read each of the below steps carefully and refer to the accompanying images. This tutorial (and the specified hardware) is recommended for this specific painting size and frame weight but can be adapted for any frame and painting weighing 8 to 12 pounds.
Framing D-Ring Hangers and Wire
Step 1

Assemble all materials and tools before starting.
- Tape Measure
- Wire Cutters
- Screw Driver
- Hanging Wire (#5 Coated Stainless Steel Wire – Rated for 43 lbs.)
- D-Rings & Wood Screws (2-Hole D-Ring Hangers Rated for 30 lbs. ea.; #6 x 1/2″ Wood Screws)
- Frame (not shown)
- Soft Cloth Work Surface (not shown)
Step 2

Thoroughly clean the rear of the frame of all debris and wood burrs. Next, mark the wire apex location: It is essential to set the apex sufficiently below the top edge of the frame so that wall-hanging hardware will not be visible from the final viewing position.
Step 3

Positioning D-Ring hangers at approximately 1/3 of the overall frame height from the top edge is recommended. (In our example, that distance is about 5-1/4″ from the top edge.) Mark the distance as shown. Repeat on the opposite side of the frame.
Step 4

The distance from the outside edge to the location of the outer D-Ring mounting screw should be approx 1″, but this distance can vary depending on the construction method and width of the frame. (Our D-Ring is approx. 2-1/4″ long, and our frame width is over 5″, so the 1″ distance is appropriate.) Mark the distance as shown. Repeat on the opposite side.
Step 5

Install the first D-Ring hanger starting with the exterior wood screw position mark from step 4. Depending on the density of your wood frame, you might need to drill pilot holes before installing your wood screws – our frame’s wood is soft enough that the screws are installed without pilot holes. The D-Ring hanger should be angled so that the plane between the outer and inner wood screw holes intersect with the estimated wire apex position from step 2 – see image at left. Install the inner wood screw as shown.
Step 6

As in step 5, position the second D-Ring hanger at the proper angle and install wood screws, starting with the outer wood screw.
Our D-Ring hangers are of the two-hole style and are rated for 30 lb, which is about three times the total weight of our project – over-specifying is better. We recommend using D-Ring hangers with two or more holes made of steel. We use Zinc plated steel D-Rings in this project.
Step 7

Starting with the first D-Ring, loop the wire into a Lark’s Head knot (see step-by-step diagram below) with 7 to 10 twists and cut ends. Important note: Do not leave the end of the wire dangling – cut it close to twists as shown. Dangling wire ends can poke into the painting from the rear resulting in a dent in the canvas or worse. Use galvanized braided steel wire rated for at least four times the frame’s weight, artwork, and hardware. (The hanging wire on our example is a coated #5 braided steel rated for 43 lbs.)

Step 8

Pull the wire through the second D-Ring loop (without making a knot) while holding the wire just below the apex position – pull the hanging wire tight (as shown in the image) until the wire sets at the 2nd D-Ring position. You now have a bend in the hanging wire as a reference starting location for step 9.
Step 9

Form the second Lark’s Head knot (using the diagram from step 7) as shown.
Step 10

After forming both Lark’s Head knots, pull the wire tightly to the apex position until all slack is removed. Your frame is ready for hanging!
Framing Rabbet Felt Strips
Step 1

Assemble all materials and tools before starting.
- Tape Measure
- Scissors
- Rabbet Felt Strips (1/4″ Wide Adhesive Backed Decco-Felt Strips)
- Frame (not shown)
- Soft Cloth Work Surface (not shown)
Step 2

Cut Felt strips to match the Rabbet width and height dimensions, and dry fit pieces into place – two strips cut to the Rabbet Height dimension and two strips at the Rabbet Width dimension – as shown. (Note: There will be a slight overlap of rabbet felt at the corners, which gets corrected in step 3.)
Step 3

After dry-fitting the Rabbet Felt strips, cut a 45-degree chamfer at each end, as shown.
Step 4
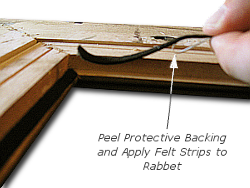
Install Rabbet Felt strips on all sides after peeling back the adhesive backing.
Step 5
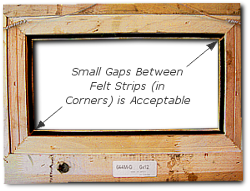
After installing Rabbet Felt strips on all sides, check that corners do not overlap – However, small gaps between the Felt in the corners it acceptable.
Why take the extra precaution of adding Rabbet Felt?

Framing Canvas Offset Clips
Step 1

Assemble all materials and tools before starting.
- Screw Driver
- Canvas Offsets (3/8″ Zinc Plated Steel)
- Artwork (not shown)
- Frame (not shown)
- Soft Cloth Work Surface (not shown)
Step 2

Place the painting into the Rabbet opening, seating the face of the artwork onto the Rabbet Felt strips applied earlier.
Step 3

Install Canvas Offsets about 4-6″ apart, as shown in the image. Only install wood screws into the wood frame, not the stretcher bars of the artwork.
Closing Notes…
I hope this tutorial for framing an oil painting was helpful. If you have questions, feel free to ask a question in the reply section below, and I will respond, or contact me directly using the contact information in the above “CONTACT” menu link.