
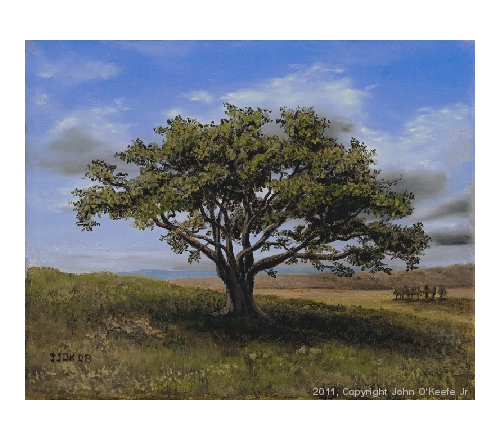
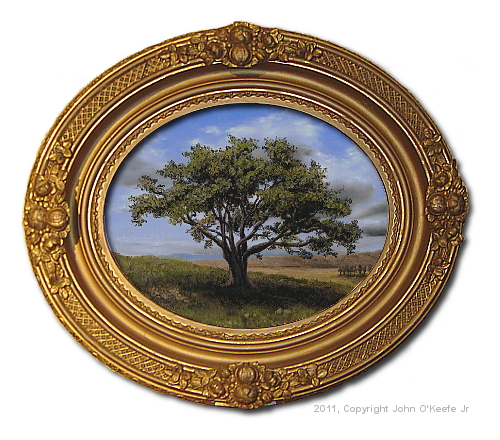
This is my 18th oil painting. I hope you enjoy my tutorial “Big Cork Tree” by John O’Keefe Jr.
Composition and Materials – “Big Cork Tree”
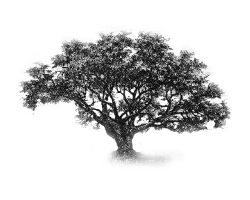
I wanted to compose the scene to fit into an oval-style frame, work on my technique for trees, and improve my use of shadows, with the tree being the center of interest. After finding an engraving of a cork tree, I sketched a rough outline of the frame opening and drew the tree on a sloped hill inside. Also, in the distance would be a vast plain, and distant mountains would make up the horizon.
- Support: Pre-Stretched & Mounted Medium Textured Cotton Canvas (Acrylic Primed)
- Size: 8 x 10 inch
- Medium: Winsor & Newton ‘Artist Oils’ Professional Grade Oil Paints
(Ivory Black, Titanium White, French Ultramarine Blue, Sap Green, Naples Yellow, Raw Sienna, and Raw Umber) - Finish: Winsor & Newton Dammar varnish
Step-By-Step Tutorial – “Big Cork Tree”
Day 1 / Hour 1
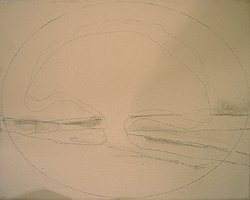
Here is the initial sketch for the painting.
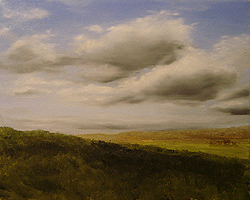
Day 1 / Hour 4
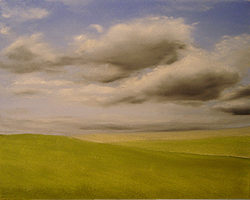
Sky and clouds were added first from a photograph taken by my wife, Jennifer. I blocked in the land features: A sloped hill, a vast plain, and distant mountains.
Day 1 / Hour 5

While the foreground paint was still wet, I began to add details to the land features. I laid in a rough outline of the tree shadow.
Day 1 / Hour 6
More details are added to the fields. I wanted a second area of interest on the plains, and you can make out a group of trees on the middle right.
Day 2 / Hour 7

After a few days of drying, I was ready to begin adding the tree. I usually wait for the paint to dry a little before adding my main features, in this case, the cork tree. After a bit of time went by, I added the trunk and some branches. I used a very dark base at this point because I plan to add my highlights later. Also, I added some highlights to the foreground, bringing out some small plants and grasses. The group of trees on the plain is detailed and shadowed.
Day 2 / Hour 8

I painted the outline of the cork tree. (Note: I painted the entire sky beforehand because I wanted to try and make this tree without having to go back and add light holes later.)
Day 2 / Hour 9

Carefully following the reference engraving of the cork tree, I started blocking the bulk of the tree leaves. I used a dark green for this because I intend to build up the tree in layers from farthest to closest. I will add the highlights as a final layer.
Day 2 / Hour 10
Once I had the leaves blocked in, I painted the branches and was careful to taper them as they extended toward the outer part of the tree. Near the outside area, they disappear.
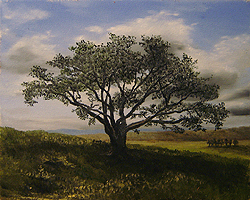
Day 3 / Hour 12
I added my first layer of highlights using a brighter green to capture the sun’s rays on the leaves. Also, I added more highlights to the foreground to improve the balance between the tree and the grassy hill. The shadow under the tree also takes on a better definition.
Day 3 / Hour 12

As a last layer on the tree, I added some darker areas. Subsequently, I felt the tree top continued to be too bright. I passed over the hill to highlight the grasses and tree shadows further.
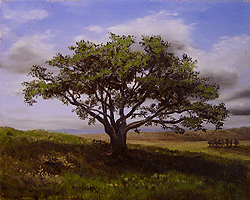
Day 4 / Hour 15
Now for the final touches. First, I added more shadow to the tree leaves to give a greater sense of light coming straight down from the top. Then the leaves on the underside are shadowed for better effect. Lastly, I added a highlight across the hill.
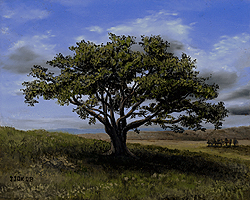
Finished Painting – “Big Cork Tree”
I hope you enjoyed my tutorial “Big Cork Tree” by John O’Keefe Jr.